Written by Ross Locksley on 14 Mar 2025
I recently posted a photo of the new Ichiban Kuji Shampoo figure, which I'd been waiting to find at a price that wouldn't break the bank. I was flattered to be asked how I'd managed to get the shot on social media, and in this instance I used a few techniques that I've found served me very well over the years. So why not share them?
Typically our anime figures end up on a shelf, but it is nice to bring out their best in a photograph. A plain background is nice and all, but what about something that evoked a mood or enhanced the figure in some way?
Cameras:
Honestly most phones these days have solid cameras for these type of shots, though I'd encourage you to use the options for focal length and lighting to get the most from your hardware. Like the filters on Instagram, it's amazing what you can do with even a basic phone. I myself use a Sony RX1-R, which is a digital fixed 35mm lens camera that I mostly use for product shots and street photography, but it's the camera my company uses and really overkill for this type of work.
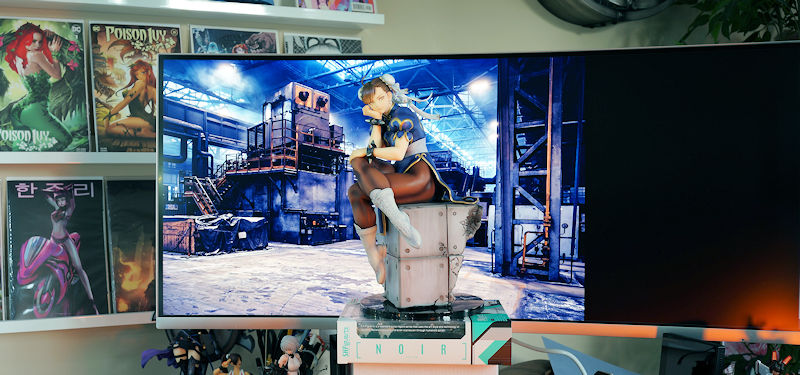
Backgrounds:
Most of us have computers or tablets these days, and that means a screen. This is a very handy resource as it means we can use photo backgrounds can help to set the scene. With AI now generating images like there's no tomorrow, you're not just limited to what's available on Google Images or your own camera, you can pretty much conjure up any environment you wish, so long as you know how to ask for it.
Images don't need to be particularly high resolution either - the one I used for Shampoo was about 600 pixels wide, but zoomed in and with the focal length trained on the figure, the background is smoothed out and becomes a slightly blurred to add depth - it's an excellent way to cover up any shortcomings in fidelity, and it'll ensure that you don't see the pixels in the shot either, as they're all smoothed out.

The blurred background detail adds a natural perspective and covers up any resolution shortcomings
However, if we're operating with anything outside of daylight scenes, we need to change the light hitting the figure in order to make it blend in. Clearly this is a darker background with a lot of red lighting, so we're going to need to match it. Happily, we have that covered too.
An LED light will absolutely change your game with this sort of photography - I use a Boling BL-P1 12W Full Colour Dimmable 2500-8500K on-camera video light, which can be set to any colour and huge intensity in a very small panel. Amazon has them for £115, but honestly it's worth every penny when you see the results. Getting the lighting to match the background transforms a picture and makes it far more believable.
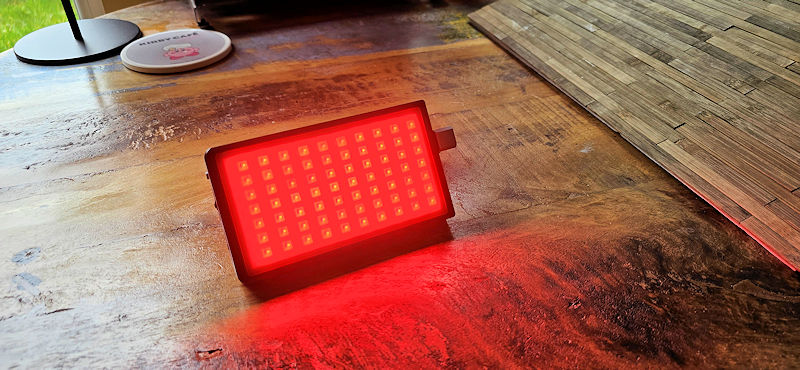
The Boling BL-P1 - a great tool for your photo arsenal.
A an example with a cooler tone would be this electric-themed shot of Noir from Synduality - the background has a lot of neon lighting, which obviously can't be reflected onto the figure since the light source is behind her, but since she's supposed to be stood in a room with lights in front and behind, we need to get some appropriate light reflections - so setting the BL-P1 to purple and setting it in front of her, we can get appropriate reflections in her hair and leather coat. The skin tone also takes on a blue-ish tinge:
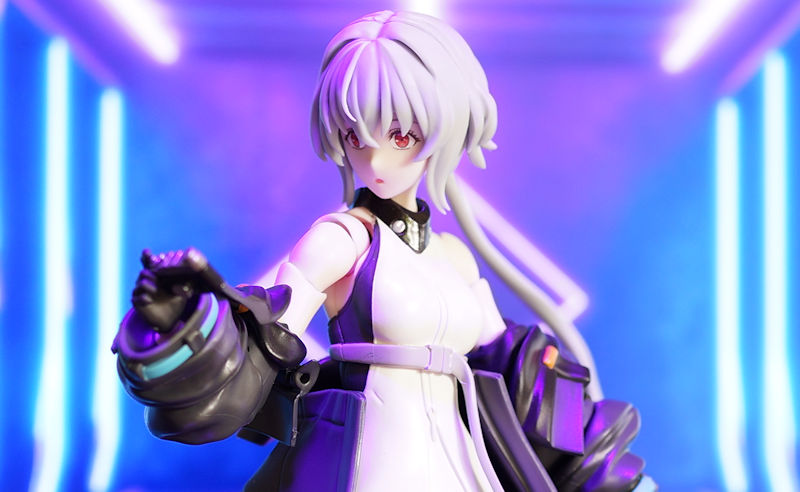
Getting the shinier services to reflect light and adding appropriate tone to the skin and clothes blend foreground and background together
Props
Another way to enhance a photo is to add some additional props to your picture - in the example above I added a barrel and a small lamp that I picked up for a few pounds each, and have used in various dioramas and displays over the years. Websites like Etsy are great for finding hand-crafted items, but you could also make your own - note the wooden floor next to Boling, that's just some wooden coffee stirring sticks glued to card and varnished. Took about 30 minutes, but now I can use it whenever I need an internal shot with a bit of character.
I also have a piece of astroturf that cost about £15 but allows me to put a figure on grass, which puts tangible detail in the foreground and blends into the background. Here are a few examples:
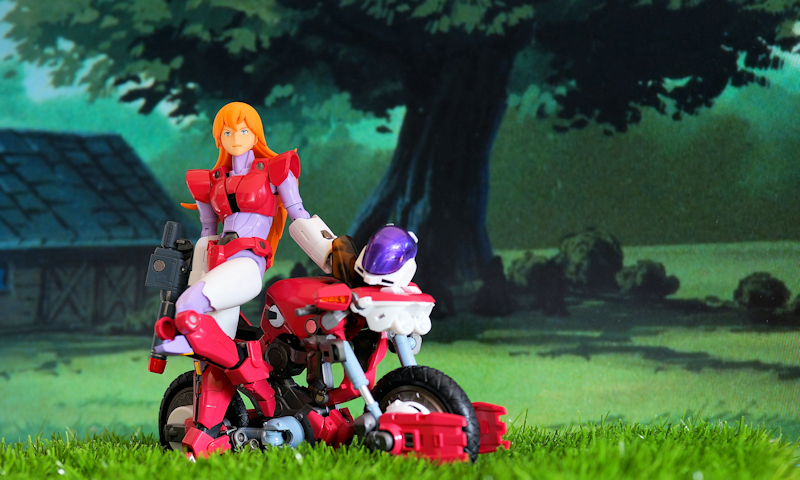
Mospeada
Bartley is stood on a piece of Astroturf, which allows the bike and figure to stand in tangible grass, while the background is a still from the anime itself which I just print-screened from the anime running on the PC. As the shot is set "outside" we only need natural light, so no additional lighting tricks required. I even kept the focas quite broad so I could keep the grain in the picture to evoke a "classic" feel for the 40 year old series. When I posted this on the Mospeada Facebook group, the bike's designer Shinji Aramaki gave it a thumbs up - made my day I can tell you!
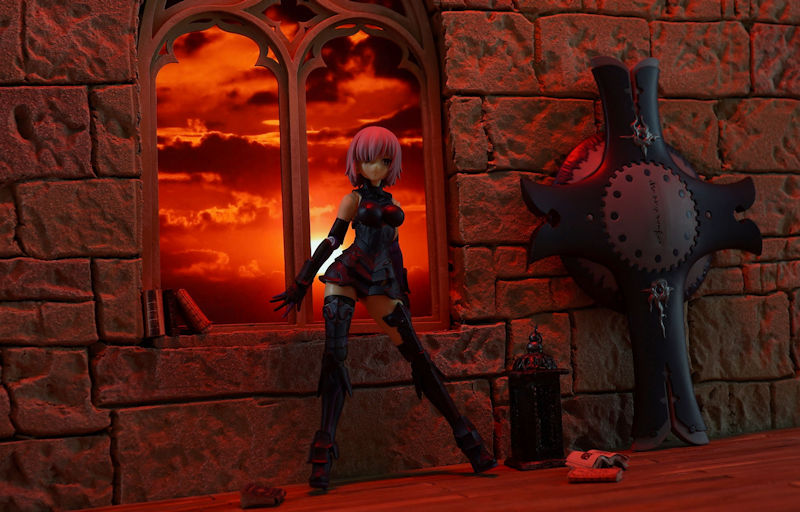
Fate Stay Night: Shielder
There's a lot going on in this shot - the wall is made from polystyrene (sculpted with a pencil and painted), the floor is made of those coffee stirrer sticks, there's the lamp from the Shampoo pic and I also have some books scattered around from a hobby shop. The window frame I picked up from Etsy (£12), and the sunset is an image on an iPad behind the wall. Lastly, I've flooded the shot with warm light so the whole picture reflects the glow you'd expect from the sun. It does show what you can do when you start layering techniques together to create your own worlds. It can also get quite addictive!
So lets break down the tips in brief:
And remember, it's never glamorous behind the scenes, but it's the finished product that counts!

Ross founded the UK Anime Network waaay back in 1995 and works in and around the anime world in his spare time. You can read his more personal articles on UKA's sister site, The Anime Independent.